Pack Planner
The Pack Planner is a degree planning tool that allows students and advisors to work together to create the best semester-by-semester plan toward an on-time graduation. A step-by-step guide of the student view of the Pack Planner is available on the Student Services Center website.
Navigate to the Pack Planner
Home > Student Information System homepage > Advising tile > Advisor Center folder > Student Center tab > Pack Planner button
- Log into MyPack Portal
- Select the Student Information System homepage
- Select the Advising tile

- Select the Advisor Center folder in the left-hand navigation
- Select the Student Center tab
- Use the ‘Change Advisee’ dropdown to select a student
- Select the yellow ‘Pack Planner’ button in the top right corner
- Use the ‘Plan’ dropdown menu in the top grey bar to select which student’s plan to view (if applicable)
Features of the Pack Planner
Advisors can use the Pack Planner to assist students with planning their degree(s), add comments to a student’s plan, and validate it. Courses that are added to the Pack Planner will be viewable in the Enrollment Wizard under ‘Planner Courses’ in the ‘Add to Cart’ section.
If the student has multiple plans, such as a double-major, the advisor can use the dropdown menu at the top of the screen to select which degree to create a plan for.
Note: Adding classes to the Pack Planner does NOT guarantee enrollment in the planned courses.
Add Courses to the Pack Planner
Browse Catalog
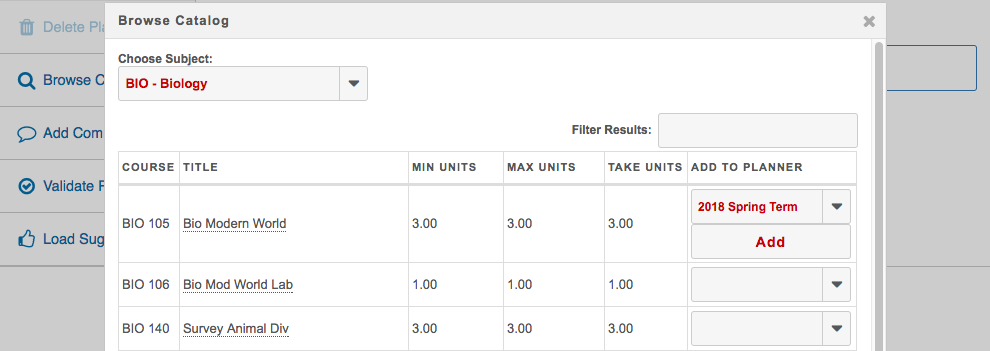
Choosing to Browse Catalog allows advisors to search for specific courses by course subject to add to the Planner. Select a subject from the dropdown menu when prompted. A list of all courses currently in the catalog for that subject will appear, along with the number of units offered for that course. You can also choose to filter the results by keyword or units. Click on the course title to view the details of the course, the terms offered, requisites, and the description.

Select a course you would like to add, and choose a term to plan it for under the right Add to Planner dropdown. Select ‘Add,’ and the course will be added to the planner for the chosen term.
Load Suggested Plan
Choosing to Load a Suggested Plan is the recommended method for building a student’s Pack Planner. Suggested plans are based on the University’s published semester-by-semester plans and each student’s remaining requirements.
If there are already courses in the Planner, you will be prompted to either preserve or delete the planned courses before loading a suggested plan.
The suggested plan will be organized by term. Advisors can choose to either add the entire suggested plan or just certain suggested terms to the Pack Planner. Advisors can also choose to simply add specific suggested courses to the planner rather than a full term.

Courses added to the planner may have a red warning icon next to them if prerequisites or requirements have not been met, or if the course is planned for a term for which it is not offered. For example, if a course is only offered in Fall terms but it has been added for a Spring term, a warning icon will appear.


Validate Plan
Once courses have been added to the planner, you can choose to Validate the Plan from the left side of the screen. The Plan Validation may return the following errors:
- Unmet Regular Requirements: Unmet degree requirements have not been added to the plan
- Non-Degree Courses: A course outside of the student’s degree requirements
- Term minimums: Terms with fewer than 12 units (undergraduate)
- Term maximums: Terms with more than 18 units
- Courses planned for terms in which they are not typically offered
- Check course requisites for these courses (requisites are currently unmet and/or unplanned)
Add a Comment
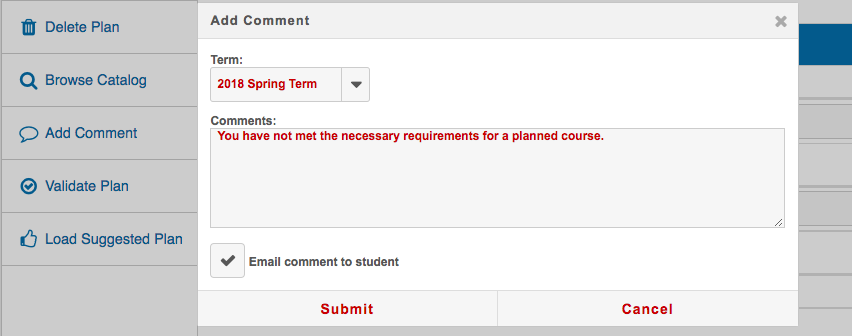
Advisors can add comments to their students’ plans using the Add a Comment feature. Advisors can select which term(s) to add a comment on, and can choose to email the student with the new comments. Students also have the ability to post comments to their Pack Planners that their advisors can see.
